Creating Dailies with Adobe SpeedGrade CS6
Adobe Speedgrade CS6 is an extremely powerful color grading application. It’s still showing some growing pains in comparison to DaVinci Resolve but, as an Adobe fanboy, I tend to overlook some of the issues to stay within the creative suite. And, yes, I’m well aware that I’ve been on a kick about processing dailies. It’s a big part of a DIT‘s job on most productions… plus I need something to write about while I work behind the scenes on making the Redcine-X to ProRes on Windows workflow friendlier.
Speedgrade, like DaVinci Resolve, processes dailies in a very similar manner: You load your clips into one continuous timeline, add an overall adjustment, possibly tweak individual clips, and set your render to export multiple files. Documentation for Speedgrade is a bit lacking, so it’s not exactly crystal clear on what export render settings to use.
Background
If you haven’t already, check out these two Adobe TV episodes. These will walk you through most of the dailies process while the rest of this post will cover the render export settings in more detail, including how to maintain time code in your exported video files.
Step 1
When you have your clips loaded in your timeline, click the Settings tab in the upper right and in the left-hand pane, select Timecode. Set Timecode to “Always load timecode of all frames”. We want our dailies to have the same timecode as our originating clips, of course.
Step 2
Click the Output tab in the upper right. Set your destination folder. For file, clear out any current filename. You will notice an “M” button next to where you type the file name, click it. This allows you to set certain metadata attributes as the filename. Navigate to Common and select “Src.PathElement.0″. This is what forces Speedgrade to create a new clip every time one presents itself on the timeline. It’s mentioned in the Adobe TV video, but isn’t explicitly stated.
Step 3
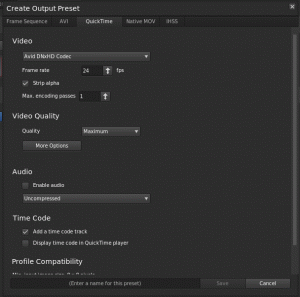
In Format & Options, click “Other…”. If you are rendering out to MOV or Native MOV, you will need to check “Add a time code track”.
Step 4
Once you’ve saved a preset with time code enabled, you’ll be presented with some more options in the output section. To the right you’ll see Time code Source, set this to “Source”. You’re ready to hit Render.
Conclusion
Adobe Speedgrade CS6 is still lacking in some departments, like its inability to import MP4 and MXF wrapped files. If that is the case, like the last job I was on with the Canon C300, then you may want to color grade a still image and then import the Speedgrade .look file into After Effects so you can batch your dailies from there.


